The basic guitar chords you'll learn on this page form the foundation of today's guitar playing. we call them beginner guitar chords,
but they are used everyday by beginners as well as advanced players and
in all styles of music. Beginners should practice these chords until
they have memorized them and are able to switch between them fluidly.
One thing that helped me a lot is learning some guitar music theory. Theory simplifies memorizing guitar chords a lot and it gives you the feeling you know what you are doing, instead of just learning some diagrams from guitar chord charts.
Open chords (some call them folk chords) are usually the first thing a beginning guitar player learns. This doesn't mean that these
beginner guitar chords
are very easy: learning to get those left hand fingers work together
and producing a clean sound is hard work, but with regular practice
you'll soon get the hang of it.
Open chords are called this way because they contain at least one open string (strings that you play without fingering them).
These basic guitar chords
are used a lot in music, especially on acoustic guitar. They also work
on electric guitar, but opens strings sound better on an acoustic
guitar in my opinion. Folk music, singer-songwriter music and country
music use a lot of open chords.
The best way to learn how to play the basic guitar chords is by learning songs. On the next page are some guitar song chords that are playable with only the basic chords you'll learn on this page. There's also a free printable guitar chord chart sheet that you can keep as a reference.
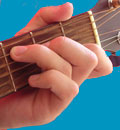
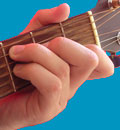
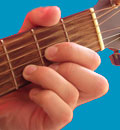
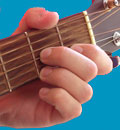
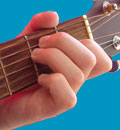
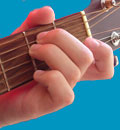
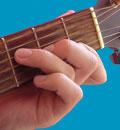
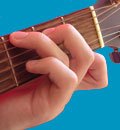
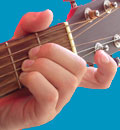
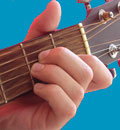
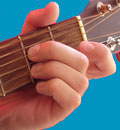
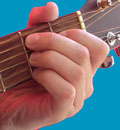
Here follows a list of basic guitar chords that every guitarist needs to know. To make it easy for you to see the guitar chord fingering,
I put the guitar chord pictures next to the charts.
Finger the chords with the top of your fingers and look out you don't touch adjacent strings.
A little bit about guitar chord names:
chords are named according to letters going from A to G
an 'm' after a letter means that the chord is a minor chord
a '7' after the letter means that the chord is a dominant chord
a letter without 'm' or '7' means that the chord is a major chord
Here's the list of basic guitar chords:
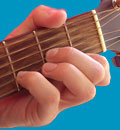
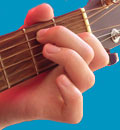
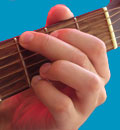
The F chord is a bit of a special case: the top 2 notes are fretted with one finger (the index finger).
This is one of the hardest chords to play for the beginner, but you'll
soon get the hang of it (if you practice enough).
2. Replacing Guitar Strings
Here's how to change guitar strings properly:
Remove
your old set of strings. Some say it's better not to remove all strings
at once, but one at a time and always replacing an old string with a
new one. When you remove all strings at once the loss of tension might
cause your guitar neck to warp. I never had this problem though.
Guitars are made without strings and a luthier will always remove an
old set of strings when doing repairs.
Polish the guitar and oil the fretboard. This is
a good time to do it, since there are no strings that get in your way.
Use a guitar polish for the guitar body and linseed, olive or walnut
oil for the fretboard .
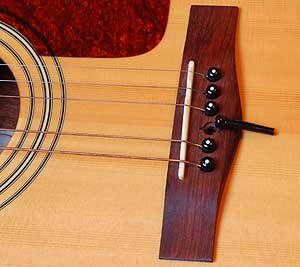
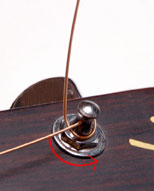
Secure
the 6th string to the bridge or tail piece of the guitar. How this
needs to be done depends on what type of guitar you have, but is
usually straightforward. On most acoustic guitars you need to remove a
peg to change the string (use a plier to do so):
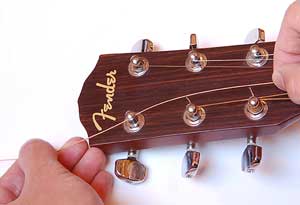
Align
the tuning peg with the nut slot, then put the string through the hole
of the tuning peg and keep about 2" (5cm) left between the string and
the fretboard. Now you have enough string left to make 2 or 3 windings,
which is sufficient. Excessive winding may cause the strings to slip.
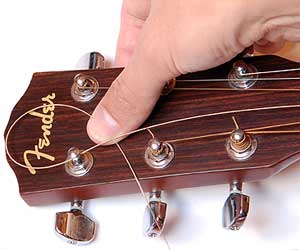
Bend the string and put it underneath itself:
Bend
the string upward and turn the tuner in clockwise direction, until the
string has the right pitch (use a guitar tuner or tuning fork) . Make the windings go down from the top.
Now pull the string at it's midway point so it is stretched. Tune it again and stretch it some more, until the string doesn't go out of tune anymore.
Cut the leftover string with a wire cutter or a toenail clipper.
Repeat for the other 5 strings.
3. More String Tips
Wash your hands before playing guitar (and before eating) and wipe your strings after playing. This helps to preserve string longevity.
When you break
a string, always replace the whole set and not a single string. The new
string will sound entirely different compared to the older strings.
If your strings break regularly, look for sharp edges on the hardware of your guitar.
It can happen that a string gets stuck in the nut slot when
tuning down. Solve this problem by putting a bit of flake graphite
(scratch it of the lead of a pencil with a knife) in the nut slot
(under the strings).
When your
guitar strings loose brilliance and intonation, it's time to change
them. How frequently this happens depends on how much time your guitar
is played and how good it is taken care of.
4. How to Tune a Guitar
In this tutorial I'll teach you how to tune a guitar.
I'll be honest, tuning your guitar is not very easy, it'll take some
time before you have mastered the art of tuning. If you are just
starting to play the guitar, I suggest you buy yourself a good guitar tuner.
It's important to learn how to tune your guitar by ear
because it is necesarry ear training. So even if you have a guitar
tuner, try to tune by ear and afterwards check with your guitar tuner
if your guitar is in tune.
An important thing to remember: you can't tune old strings.
Safe yourself the frustration, don't try it. The normal life span of a
set of strings if you play a lot (3 hours a day) is about 3 months, if
you play less, about 6 months. So if your strings are old, go buy
yourself a new set and follow this tutorial on changing guitar strings.
A. How to Tune a Guitar - The Fretted Method
You need to know the note names of the guitar strings for this tutorial. Here's a reference:
Guitar strings are numbered from high to low pitch. The high e (skiniest string) is string 1, the b string is string 2, ... The low E string (the fat one) is string number 6.
First you need to tune the low E string (string 6) to a reference tone. This can be done by playing an E note on the piano, by using a pitch pipe or by using a recorded E note, such as this one:
Push the play button on the above reference
tone (you might have to push twice) and listen to the tone carefully.
Now strike the low E-string of your guitar. Does the low E of your
guitar sound lower or higher comparred to the reference tone?
If your guitar sounds lower: turn the tuning key slowly in clockwise
direction until it is about the same pitch as the reference key. When
the pitch of the guitar comes close to the reference pitch, you'll
notice that the sound begins to wave. Turn the tuning key bit
by bit and the wave will begin to slow down until it comletely stops.
That's when the 2 tones are in tune. If you go too far, the wave will
increase again (go to the next point if that happens).
If your guitar sounds higher: turn the tuning key in counter clockwise
direction until is lower than the reference tone. Then go back to the
previous point. Always go lower first when you are tuned too high,
otherwise the string might get stuck in some places.
Now finger the low E-string close to the 5th fret:
The note you are holding with your finger is an A, the same note as the
5th string in open position. To tune the A string, play both strings together and use the tuning key to adjust the pitch of the A string. Use the method from step 2 to do this.
When the A string is in tune, finger the 5th fret on the A string. This is a D note, the same note as the 4th string. Play both strings together and get them in tune.
Finger the 5th fret on the D string. This produces a G note, the same note as the 3rd string. Play both strings together and tune. If you are learning how to tune a bass guitar, then this is where it stops, only 4 strings on a bass guitar.
This step is a little different. Instead of fingering the 5th fret, we are now going to use the 4th fret of the G string. This produces a B note, the same note as the second string. Play them together and get them in tune.
Hold the 5th fret on the B string. This produces an E note, the same note as the high E string. Play both strings together and tune them.
B. How to Tune a Guitar - The Harmonics Method
Here is another method to tune your guitar, it uses harmonics. This way of tuning is more accurate compared to the fretted method.
Play a harmonic note at the 5th fret of the low E string. You can produce a harmonic by lightly touching the string with a left hand finger above the 5th fret. Do not press down, just lightly hold your finger on the string. Now pick the note.
The tone you hear is an E note. Tune that note to our reference note, in the same way we did in the fretted method (see above):
Use your left hand index finger to play the same harmonic on the 5th fret of the E string and while the note is still sounding, play the harmonic on the 7th fret of the A string
with you pinky. These are the same notes (E), tune the A string until
both notes match. Again, play attention to the wave effect.
Note that you do not have to hold your finger on the string after you
have picked the note, the sound will continue when you remove your
finger.
Play the harmonic on the 5th fret of the A string and the one on the 7th fret of the D string and tune the D string.
Play the harmonic on the 5th fret of the D string and on the 7th fret of the G string. Tune the G string.
To tune the B string we have to use the fretted method (see above) because we can't play a harmonic on the 6th fret of the B string. Play the normal note on the 5th fret of the G string together with the open B string and tune the B string.
Play the harmonic on the 5th fret of the B string and on the 7th fret of the high E string and tune the E string.